Accessing your local Kafka/Redpanda Pulsar data using ngrok + Timeplus
- Jove Zhong

- Jan 11, 2023
- 5 min read
Timeplus Cloud simplifies streaming analytics, enabling developers to quickly gain data insights from Confluent Cloud, Redpanda Cloud and StreamNative Cloud without a single line of code. But what about your on-premise Apache Kafka, Redpanda or Apache Pulsar cluster, or just the Kafka docker instance on your laptop? We’ve got you covered. In this blog post, we will show you how to use ngrok to securely expose your on-prem data sources so that Timeplus Cloud can load streaming data in and provide real-time analysis. (For visual learners, check out our YouTube demo.)
First, a high-level view of how Timeplus and ngrok work together:

About ngrok
ngrok is used by 5 million developers across the globe. The first version of ngrok was released 10 years ago. Recently, they announced their 50 million Series A fundraising, with the position of “Ingress as a Service”.
“We call ngrok ingress-as-a-service because instead of taping together chains of proxies, firewalls, routing configurations, gateways, and middleware, ngrok collapses those networking primitives into a single, unified layer of global infrastructure that we’ve operationalized for you.” – ngrok.com
Simply put, you can securely expose ports in your local server or local network to the public network. No one on the internet is able to access your file system, or other ports. You can even apply extra authentication to your local service. For example, you can start an Apache httpd server or Apache Tomcat Java application server locally without authentication. Then use ngrok http 8000 --basic-auth="thomas:anderson" to add HTTP Basic Auth in one step.
You can create a free account at https://ngrok.com/ and check their documentation to learn more.
1. Setting up Kafka/Redpanda
Let’s set up a Kafka server on your laptop and use Timeplus Cloud to access the data. For Pulsar, a similar process can be applied. If you already have Kafka or Redpanda on your local machine or local network, feel free to skip this section.
For the sake of simplicity, this tutorial will use docker-compose to set up a Redpanda (backend) server, Redpanda Console, and Owl Shop to generate simulated streaming data for ecommerce use cases. To do this:
Ensure you already have Docker Engine and Docker Compose installed on your local machine
Create a new folder and give it a name like `demo`
Visit https://docs.redpanda.com/docs/platform/console/reference/docker-compose/ and click the Copy button to save it to the docker-compose.yml in the demo folder.
Start the entire stack with the -d option to run in detached mode: `docker-compose up -d`
It may take 1-2 minutes to download all docker images and get the stack ready. Once the docker-compose stack is up and running, navigate to the Redpanda Console at http://localhost:8080/. Click on the Topics menu item, you will see 5 topics have been created to simulate the ecommerce shop use case.

Congratulations! In less than 2 minutes, you have successfully set up a local Redpanda server with some sample live data. You can use any Kafka SDK or client to consume the data from localhost:9092, such as `kcat -L -b localhost:9092`
Next, let’s expose the 9092 port to Timeplus Cloud with the help of ngrok.
2. Setting up ngrok
Sign up for a free account at https://ngrok.com and download the agent for your operating system.

Log on to the ngrok dashboard to get your Auth Token and add it to your CLI configuration, e.g.
ngrok config add-authtoken <token>
Run the command `ngrok tcp 9092` to expose the broker to the internet. You will get a full-screen output of the ngrok status:

3. Updating Kafka settings with the new broker URL
We are almost done with the setup process. The last step is editing the docker-compose.yml in your demo folder.
1. The original content for line 10 is:
- --advertise-kafka-addr PLAINTEXT://redpanda:29092,OUTSIDE://localhost:9092
Change it to:
- --advertise-kafka-addr PLAINTEXT://redpanda:29092,OUTSIDE://8.tcp.ngrok.io:12334
2. Restart the docker-compose stack to apply the change by running this command: docker-compose down && docker-compose up -d
This “magic” step will ensure that a remote client can access the broker address and that the broker will return the correct address back to the client for subsequent data consumption. For more details, check out this blog.
If you have a remote server, you may run the following command to consume the data on your local laptop:
kcat -C -b 8.tcp.ngrok.io:12334 -t owlshop-frontend-events
{"version":0,"requestedUrl":"http://www.humantechnologies.name/back-end/deploy/plug-and-play/infrastructures","method":"PUT","correlationId":"75888c5c-1beb-4287-905b-c870841bbf2f","ipAddress":"16.146.34.158","requestDuration":846,"response":{"size":1856,"statusCode":200},"headers":{"accept":"*/*","accept-encoding":"gzip","cache-control":"max-age=0","origin":"https://www.seniororchestrate.info/functionalities/iterate/incubate/vertical","referrer":"https://www.humanexploit.org/user-centric/markets/maximize","user-agent":"Mozilla/5.0 (Windows NT 6.0; en-US; rv:1.9.0.20) Gecko/1998-08-01 Firefox/36.0"}}
{"version":0,"requestedUrl":"https://www.directoptimize.org/aggregate/e-business/interfaces","method":"PATCH","correlationId":"b09744bd-6d07-4de9-bc85-523347434e86","ipAddress":"117.13.19.180","requestDuration":1172,"response":{"size":1178,"statusCode":200},"headers":{"accept":"*/*","accept-encoding":"gzip","cache-control":"max-age=0","origin":"https://www.internationaldeliver.com/synergistic/scale/next-generation/morph","referrer":"https://www.futureaggregate.info/bandwidth/24-365","user-agent":"Opera/10.39 (Macintosh; PPC Mac OS X 10_7_4; en-US) Presto/2.9.260 Version/10.00"}}
Neat! This proves that our network is working correctly. However, it’s oftentimes difficult and time-consuming to understand these massive JSON messages. In the following step, we will demonstrate how to use Timeplus Cloud to easily decipher your JSON output.
4. Using Timeplus Cloud for intuitive streaming analysis
If you don’t have an account for Timeplus Cloud yet, sign up for free at http://timeplus.cloud with your Google or Microsoft account, or your work email.
Set a name for your workspace and it will be ready to use in under a minute. Go to the Sources tab from the left-hand side menu and create a new Redpanda source.

Then:
Specify a meaningful and unique source name
Set the broker as the one provided by ngrok
Disable the authentication method
Set the topic name, such as in our example, owlshop-frontend-events
Leave other options “as is”

Click the Next button. Timeplus will load a few sample messages from the topic and turn the JSON message into columns. Choose a stream name, and note that it should only contain letters, numbers, and _. In our example, we can use owlshop_frontend_events. (The reason - is not supported is because it is common in SQL statements for numbers)

Once the source is set up, you can query the data easily using `SELECT * FROM <stream>`

Then, you can easily build real-time charts to understand the data pattern, e.g.
SELECT method, count(*) as cnt FROM owlshop_frontend_events GROUP BY method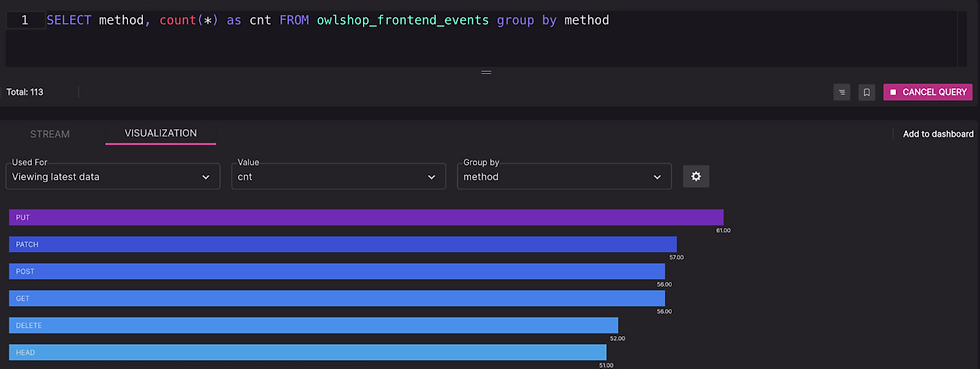
You can add your chart to a dashboard.

Timeplus also supports powerful JSON expression and aggregation. For example, to get the response bytes per second, the SQL is:
SELECT window_start, sum(response:size::int) as bytes
FROM tumble(owlshop_frontend_events,1s) GROUP BY window_start
Here is a simple dashboard with two live charts:

Summary
We love our developer community, and are always trying to find ways to make their (very demanding) jobs easier. We’ve worked hard to provide a cloud solution that does this. With great tools like ngrok, we’re thrilled that using Timeplus in a hybrid mode is equally easy.
Note: In addition to using Timeplus Cloud to pull data from your local source, you can also use our “connectors” for Kafka Connect and Pulsar I/O Sink to push data from on-prem to Timeplus Cloud. A destination connector for AirByte will also be available soon. Stay tuned!

